 Skip to content
Doing your own manicure at home might seem difficult at first, but it can actually save you a lot of money and give you better control over nail health. Many people spend thousands every year at salons without realizing they can achieve similar results at home with simple tools and the right method.
The key is not expensive products or professional skills, but following the correct steps in the right order. Once you understand the process, you can get clean, long-lasting results without damaging your nails.
Also Read


In this guide, you will learn a beginner-friendly, step-by-step manicure method that is easy, affordable, and safe for your natural nails.
Perfect Manicure Home Complete Beginner Guide Step By Step
| Step | What You Do | Time Needed | Tools Required |
|---|---|---|---|
| 1 | Remove old polish | 2 minutes | Acetone-free remover, cotton pads |
| 2 | Shape your nails | 5 minutes | Nail file (180 grit) |
| 3 | Soak in warm water | 5 minutes | Bowl, warm water, soap |
| 4 | Push cuticles | 3 minutes | Wooden cuticle pusher |
| 5 | Exfoliate hands | 2 minutes | Sugar scrub or hand scrub |
| 6 | Moisturize | 2 minutes | Hand cream or cuticle oil |
| 7 | Clean nail surface | 1 minute | Rubbing alcohol, cotton |
| 8 | Apply base coat | 3 minutes | Clear base coat |
| 9 | Apply polish | 8 minutes | Nail polish |
| 10 | Apply top coat | 3 minutes | Clear top coat |
| 11 | Clean up edges | 2 minutes | Small brush, remover |
Right Perfect Result Every Single Time
The secret to a home manicure done right is not talent or expensive products. It is following the correct sequence without skipping steps. Every step exists for a reason. Skip the base coat, and your nails stain yellow. Skip the soak, and your cuticles tear. Rush the drying time, and your polish smudges within an hour.
I learned this the hard way during my first three attempts. Now I follow the same order every single time, and my results are consistent, clean, and salon quality.
Beginner Manicure Guide
If you have never given yourself a manicure before, do not overthink it. The beginner manicure guide I am sharing here uses basic tools that cost under 500 Rupees total. You do not need UV lamps, gel kits, or professional training.
All you need is a nail file, a cuticle pusher, base coat, your chosen polish color, top coat, cotton pads, and nail polish remover. That is it. I bought my entire kit from a local beauty supply store near my house for 450 Rupees in early 2026.
Home Method Finally Revealed
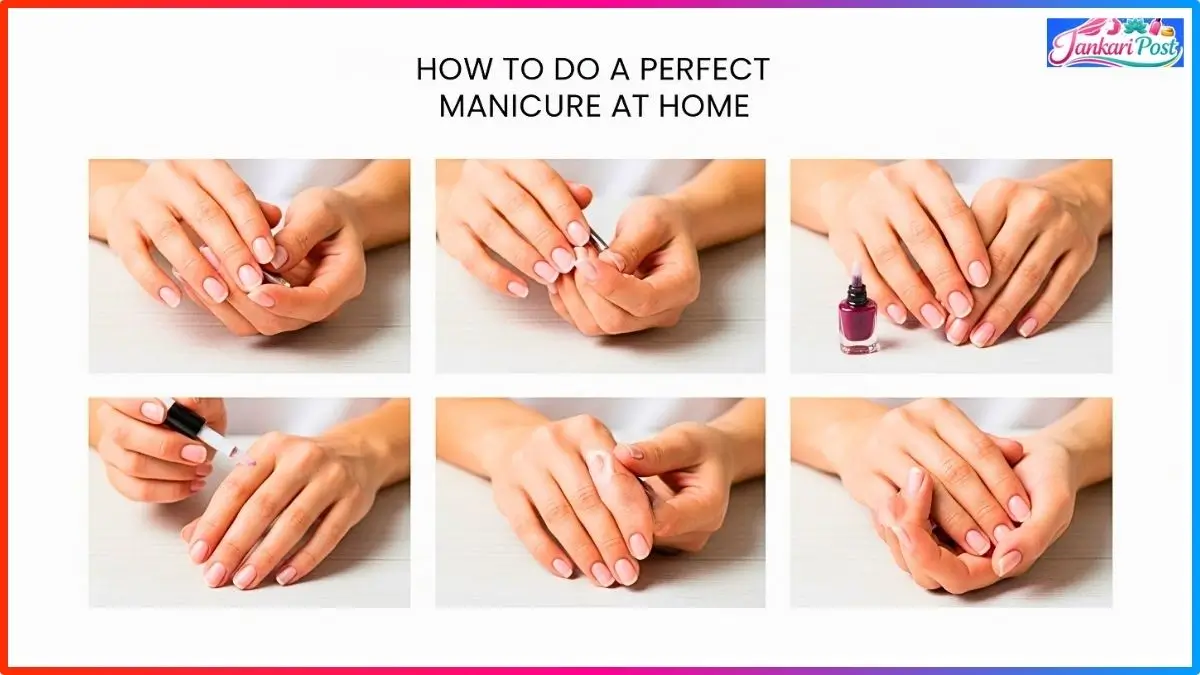
Let me walk you through the step-by-step manicure method I follow every Sunday evening. This is the exact routine that gives me chip-free nails for a full five to six days.

Start by removing any old polish completely. Use an acetone-free remover because acetone dries out your nails and cuticles over time. Soak a cotton pad with remover, press it against the nail for five seconds, then wipe downward in one motion. Repeat until every trace of old color is gone.
Home Perfect Finish Beginner Can Do
A complete manicure at home covers more than just painting your nails. It includes nail shaping, cuticle care, hand exfoliation, moisturizing, and then the actual polish application. Each of these steps contributes to the final result.
Skipping hand care and jumping straight to polish is the most common beginner mistake. Your nails might look colorful, but your hands will still look rough and dry. The full process takes 35 to 40 minutes, and the difference in quality is massive.
Tools Needed Before Beginning
Before you sit down to start, gather every tool needed in one place. Running to grab things mid manicure is how smudges happen. Lay everything out on a clean towel on your table.
Essential Tools Table
| Tool | Approximate Cost | Where To Buy |
|---|---|---|
| Nail File 180 Grit | 30 to 50 Rupees | Any beauty supply store |
| Wooden Cuticle Pusher | 20 to 40 Rupees | Pharmacy or beauty store |
| Base Coat | 80 to 200 Rupees | Online or beauty store |
| Top Coat | 80 to 200 Rupees | Online or beauty store |
| Nail Polish | 60 to 400 Rupees | Wide range available |
| Cuticle Oil or Cream | 50 to 150 Rupees | Pharmacy |
| Cotton Pads | 40 to 80 Rupees | Any general store |
| Acetone Free Remover | 60 to 150 Rupees | Beauty store or pharmacy |
How To Clean Nails Before Starting?
Proper nail prep determines whether your polish lasts two days or six days. Start by washing your hands with regular soap and warm water. Then take a cotton pad soaked in nail polish remover and wipe each nail surface, even if there is no old polish on them.

This removes the invisible layer of natural oil that sits on your nail plate. Polish cannot bond properly to oily nails. This single step doubled the lifespan of my manicure when I started doing it consistently in 2026.
Which Shape Suits Your Hand Best?
Choosing the right nail shape is surprisingly important because the wrong shape can make your fingers look shorter or wider than they actually are. There are four basic shapes to consider.
Round shape works best for short nails and wider nail beds. Squarshapesuitts longer nails and gives a modern, clean look. Oval shape is universally flattering and elongates the appearance of your fingers. Almond shape looks elegant but requires slightly longer nails to achieve properly.
Nail Shape Quick Guide
| Shape | Best For | Difficulty Level |
|---|---|---|
| Round | Short nails and beginners | Easy |
| Square | Medium to long nails | Easy |
| Oval | All nail lengths | Medium |
| Almond | Longer nails | Medium to hard |
I file my nails into an oval shape because it suits my medium-length fingers. File in one direction only from the outer edge toward the center. Never saw back and forth because that weakens and splits the nail.
When can the Warm Water Step be skipped?
The warm water soak softens your cuticles so they push back easily without tearing. Fill a bowl with warm water and add a few drops of liquid soap or a teaspoon of olive oil. Soak your fingertips for five minutes.
Do not soak longer than five minutes. Over-soaking expands the nail plate temporarily, and when it contracts back to its normal size, your polish cracks prematurely. Five minutes is the sweet spot I found after testing different durations throughout 2026.
How To Push Without Causing Pain?

Cuticle care is where most beginners hurt themselves. Never cut your cuticles. Cutting creates open wounds that invite infection and makes cuticles grow back thicker and rougher over time.
Instead, use a wooden or rubber cuticle pusher. Hold it at a 45-degree angle against the base of your nail and push gently backward using small circular motions. The softened cuticle will move easily without any pain. If it does not budge, your soak was too short. Go back and soak for another two minutes.
Hand Exfoliation After Cuticle Work
After pushing cuticle, I always exfoliate my hands with a simple sugar scrub. Mix one tablespoon of regular sugar with a few drops of olive oil and gently rub it over your hands and fingers for one minute. Rinse with warm water and pat dry. Your hands will feel incredibly smooth.
Moisturizing Before Polish
Apply a generous amount of hand cream or body lotion to your hands and massage it in for a full minute. Focus on the cuticle area and the skin around each nail. However, here is the critical part. After moisturizing, wipe each nail surface clean with a cotton pad dipped in rubbing alcohol. Lotion residue on the nail plate prevents polish from sticking.
Why This Step Saves Your Manicure?
The base coat does three important things. It prevents dark nail polish from staining your natural nails yellow. It creates a smooth surface for the color coat to glide on evenly. And it acts as an adhesion layer that makes the polish bond to your nail properly.
Apply one thin layer of clear base coat to each nail. Start with a single stroke down the center of the nail, then one stroke on the left side, then one on the right side. Three strokes per nail. Let it dry for two minutes before applying color.
How To Paint Without Any Mess?
This is the step that separates a decent manicure from a perfect one. Load your brush with polish and wipe off the excess against the bottle neck. You want just enough polish on the brush to cover one nail in three strokes.
Place the brush slightly above the cuticle line, not touching it. Press down gently and push the brush toward the tip of the nail in one smooth stroke. Repeat on the left side and right side. Three strokes per nail. The gap you leave near the cuticle gives a cleaner, more professional appearance. Apply two thin coats of color rather than one thick coat. Thin coats dry faster and look smoother.
Secret for Long-Lasting Look
The top coat is your manicure’s protective shield. Without it, your color will chip within 24 to 48 hours. With it, your manicure can last five to seven days, depending on your daily activities.
Apply one thin layer of top coat over each painted nail using the same three-stroke technique. Make sure to seal the free edge of each nail by running the brush across the tip. This prevents water and detergents from lifting the polish from underneath. I reapply top coat every two to three days to extend my manicure’s life even further.
How Long Before Nails Are Fully Safe?
This is where patience saves everything. Dry time is the most underestimated step. Your nails feel dry to a light touch within 10 to 15 minutes. But they are not fully hardened until about 45 to 60 minutes after the final coat.

During that first hour, avoid washing dishes, typing aggressively, or digging through your purse. The quickest way to ruin a fresh manicure is impatience. I usually do my manicure right before watching a movie, so my hands stay idle for a full hour without feeling restless.
Quick Drying Tips That Actually Work
Dipping your nails in ice-cold water after 10 minutes of air drying reportedly helps the top layer set faster. I have tried this, and it does seem to reduce surface tackiness. Another method is applying a drop of cuticle oil over each nail after 10 minutes. The oil floats on top and prevents smudging while the polish underneath continues to cure.
Full Beginner Checklist To Follow 2026
- Remove all old polish completely with acetone-free remover
- File nails into your chosen shape using one-directional strokes only
- Soak fingertips in warm, soapy water for exactly five minutes
- Push cuticles gently using a wooden pusher at a 45-degree angle
- Exfoliate hands with sugar and olive oil scrub for one minute
- Moisturize hands and then wipe nail surfaces clean with alcohol
- Apply one thin layer of base coat using three strokes per nail
- Apply the first thin coat of color polish and wait three minutes
- Apply a second thin coat of color and wait three minutes
- Apply top coat and seal the free edge of each nail
- Wait 45 to 60 minutes before using your hands for any activity
- Apply cuticle oil daily to maintain results throughout the week
Cleanup After Polishing
Even with careful application, you will get some polish on your skin. Wait until the polish is almost dry, then dip a small, angled brush in nail polish remover and carefully trace around each nail to clean up the edges. This final touch makes every manicure look professionally done. A thin eyeliner brush works perfectly for this.
Frequently Asked Questions
How often should I do a manicure at home?
Once a week is ideal for maintaining healthy nails and a clean appearance. Doing it more often can dry out your cuticles and weaken your nail plate.
Can I skip the base coat if I use light colored polish?
No. Even light colors contain pigments that stain nails over time. Base coat also improves adhesion, which makes any color polish last significantly longer.
Why does my nail polish chip within two days?
Most likely, you are applying the coat thickly or skipping the top coat. Thin coats dry properly and bond better. Top coat seals everything and prevents premature chipping.
Is a gel manicure at home better than regular polish?
Gel lasts longer but requires a UV lamp and special removal process. For beginners, regular polish is easier, cheaper, and gentler on natural nails.
How do I fix a smudge without restarting the entire nail?
Wait until the smudged polish is slightly tacky. Lick your finger tip and gently smooth the smudge. Then apply another thin coat of color over that nail only.
My Final Word
Friends, the perfect manicure at home is not about perfection on your first try. It is about building a simple weekly routine that keeps your nails looking clean and polished without spending 600 to 800 Rupees at a salon every two weeks. My eighth attempt was the one where everything came together.
Yours might be your fifth or your tenth. The point is that every attempt gets better, and the savings add up fast. Give yourself 40 minutes this weekend, follow these steps exactly, and see what happens. I think you will surprise yourself.
Disclaimer
This content is for informational purposes only and is based on personal experience. Results may vary depending on individual nail health and products used. Always perform a patch test and consult a professional if you have sensitive skin, nail conditions, or infections before trying any home manicure method.

Dr. Jushya Bhatia Sarin is a qualified dermatologist with M.B.B.S., M.D. (Dermatology, Venereology & Leprosy), and MRCP (SCE), UK. She is the founder member of Sarin Skin Clinic in Defence Colony, New Delhi, specializing in skin, hair, and nail health. Her work focuses on providing personalized skincare solutions and making reliable skin care knowledge accessible to everyone.
