 Skip to content
Many of us spend hundreds of rupees every month on lip balms that promise long-lasting hydration but deliver only temporary relief. Dry, chapped lips keep coming back, no matter how many products we try. That was exactly my situation until I decided to try a simple homemade solution using natural ingredients.
What started as a casual suggestion quickly turned into a complete routine change. Within days, I noticed softer, healthier lips without constantly reapplying products. The best part was that this DIY lip balm took less than 10 minutes to prepare and cost a fraction of store-bought options.
Also Read

In this guide, I will share the exact recipe, ingredients, and method that worked for me. If you are looking for an affordable, natural, and effective way to care for your lips, this simple DIY solution might be exactly what you need.
Quick Overview
| Category | Details |
|---|---|
| Total Preparation Time | Under 10 Minutes |
| Cost Per Batch | ₹50 to ₹150 |
| Shelf Life | 3 to 6 Months |
| Key Ingredients | Beeswax, Coconut Oil, Shea Butter, Honey |
| Best Storage Option | Small Tin or Lip Balm Tube |
| Suitable For | All Skin Types |
| Difficulty Level | Easy |
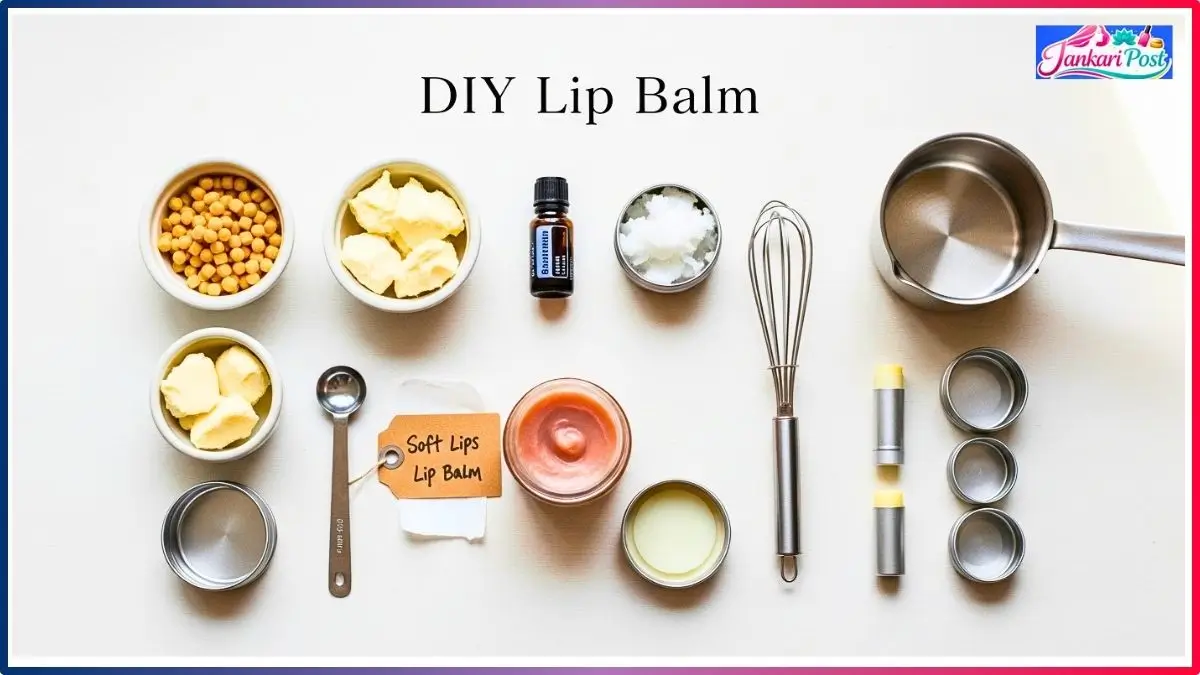
Soft Lips Ready in Under 10 Minutes
Most people think making lip balm at home needs special equipment and hours of preparation. I thought the same until I actually sat down and did it myself. You only need a small bowl, a pot of water, and five natural ingredients that most Indian kitchens already have. Everything melts together in under 10 minutes, and what you get at the end is a smooth, creamy balm that works better than anything sitting on a pharmacy shelf right now.
I have repeated this recipe six times, and every batch takes me roughly the same amount of time. Once you do it the first time, you wonder why the internet makes this whole thing sound so complicated when it really is not.
lm Easy Best Ingredients That Work

Choosing the right ingredients decides whether your natural lip balm will be a success or a waste of time. I went through trial and error before landing on five specific ingredients that work perfectly together. Each one plays a clear role, and removing any of them changes the texture and effectiveness of the final product noticeably.
In 2026, the clean beauty movement is growing fast across India. People want to see and understand what they put on their skin. When you use ingredients you can pronounce and even eat safely, it gives you a level of confidence that no packaged product from a store can ever match.
Why This Ingredient Works Best?
Beeswax is the foundation of any good homemade lip balm. It gives structure and firmness so you can carry it in your pocket without it turning into a puddle. I bought cosmetic-grade beeswax pellets online for about ₹120 per 100 grams, and one tablespoon per batch is more than enough. It melts smoothly, blends well with oils, and creates a protective seal on your lips that locks moisture in for hours at a stretch.
How does it lock moisture inside?

Coconut oil handles the hydration part of the formula. It absorbs into your lip skin quickly and does not leave behind a heavy, greasy feeling that makes you want to wipe it off. I use virgin cold-pressed coconut oil, which costs ₹80 to ₹120 at any local grocery store. In 2026, dermatologists across India still rank it among the top three safest natural moisturizers for everyday lip care.
Honey Mixed with Natural Sweetener Heals Dry Lips
Half a teaspoon of raw honey transforms your lip balm completely. Honey is a natural humectant, which means it attracts moisture from the surrounding air and holds it against your lips. It also accelerates healing for cracked or peeling skin, which makes it invaluable during harsh winter months. Within three days of using my honey-infused batch, I noticed a visible difference in how smooth my lips felt.
Which Flavor Worked Most Pleasantly?
I tested peppermint, lavender, and vanilla essential oils in separate batches to find which one I liked most. Peppermint delivered a cool, refreshing tingle. Lavender felt calm and soothing. Vanilla smelled amazing and added a naturally sweet undertone. In 2026, my go-to combination is peppermint for day use and vanilla before bed. A 15ml bottle costs ₹150 to ₹250 and lasts months because you only add three to four drops per batch.
Shea Butter Try Did It Make Balm More Smooth
Shea butter made the biggest difference in how the balm felt on my lips. Without it, the texture was stiff and waxy. With it, the balm glided on effortlessly and felt creamy and rich. I ordered unrefined shea butter online for ₹200 per 100 grams. It contains vitamins A and E, which help repair damaged lip skin naturally over time without any chemical assistance.
Real Simple Recipe Proven Results

Here is the exact recipe I follow every single time I make a batch. I have tested this multiple times now, and the results stay consistent.
Ingredients You Need
- 1 tablespoon beeswax pellets
- 1 tablespoon virgin coconut oil
- 1 teaspoon unrefined shea butter
- Half a teaspoon of raw honey
- 3 to 4 drops essential oil of your choice
The only equipment required is a small steel bowl, a pot of water, a stirring spoon, and your storage containers. Nothing fancy. Nothing expensive. Total investment for the equipment, if you need to buy it fresh, is under ₹200, and you reuse everything every time.
How To Melt Without Burning?
I follow the double-boiler method every time, and it has never failed me. Place a small steel bowl inside a larger pot filled with simmering water. Add the beeswax pellets first because they take the longest to melt. Once the wax turns liquid, add the coconut oil and shea butter and stir gently until everything combines into one smooth, clear liquid.
Remove from heat immediately and stir in the honey and essential oil drops while the mixture is still warm. Never place your bowl directly on the flame because direct heat burns the wax and ruins the entire batch.
Mold Or Container Which Worked Better For Storage
I experimented with both small tin containers and twist-up lip balm tubes. The tins won easily because they are simpler to fill, and the balm sets evenly inside without air bubbles.
You can buy empty lip balm tins online in packs of five for ₹100 to ₹150. If you prefer tubes, pour slowly using a narrow spoon or dropper while the mixture is still liquid because it begins setting within a few minutes after you take it off the heat.
How Long Before Balm Was Ready?
After pouring, leave the containers completely undisturbed on your kitchen counter for about 30 to 45 minutes. The balm solidifies fully at room temperature. I made the mistake of refrigerating my first batch, hoping it would set faster, but the surface cracked and looked uneven.
Room temperature cooling always gives the cleanest, smoothest finishes. During the Indian summer months in 2026, it might take a few extra minutes to fully harden, but patience gives you a better final product.
Secret Fast Kitchen Ingredients Win Again

The real secret to permanently soft lips is not some imported cream or overpriced serum. It is basic kitchen ingredients combined in the right proportions. My homemade lip balm keeps my lips moisturized for 8 to 10 hours with just two applications throughout the day.
Store-bought balms rarely lasted me more than 4 hours because they contain alcohol, synthetic fragrances, and preservatives that actually strip moisture from your lips over time. Natural ingredients break that cycle completely.
How did Lips Feel After First Use?
The first time I applied my DIY lip balm, I could feel the difference within minutes. My lips felt hydrated, smooth, and naturally healthy without any sticky or artificial sensation. After two weeks of consistent use, the dry patches on my lower lip disappeared entirely.
My lips stopped cracking even when I sat in air-conditioned rooms for eight hours straight at work. Three of my friends noticed the change and asked what product I had started using. When I told them I made it at home, they could not believe it until I showed them the recipe.
Better Than Any Store Product
When I compare my homemade lip balm with store-bought options side by side, the numbers make the decision obvious.
Cost and Quality Comparison
| Factor | DIY Lip Balm | Store Bought Lip Balm |
|---|---|---|
| Cost Per Unit | ₹25 to ₹40 | ₹200 to ₹500 |
| Ingredients | 100 Percent Natural | Chemical Additives Included |
| Shelf Life | 3 to 6 Months | 12 to 24 Months |
| Moisture Duration | 8 to 10 Hours | 4 to 5 Hours |
| Customization | Fully Customizable | Fixed Formula |
| Preparation Time | Under 10 Minutes | Not Applicable |
These numbers speak for themselves. You save money, you get a product that actually hydrates longer, and you control every single ingredient that touches your lips. There is no logical reason to spend ₹300 or more on a commercial lip balm when you can make something noticeably better at home for a fraction of that price.
Common Mistakes I Made So You Can Avoid Them
My first batch was far from perfect. I added too much beeswax, which made the balm rock hard and difficult to apply. The ratio between wax and oils matters a lot. Too much wax gives you a stiff balm that drags across your lips. Too much oil gives you a mushy product that melts inside your bag. The ratio I shared above is the balanced sweet spot that took me three failed batches to figure out.
Another mistake was not mixing the honey properly. Honey does not blend easily into oils, so you need to stir vigorously while the mixture is warm. If you skip this step, you end up with uneven texture and tiny honey pockets inside the balm that feel lumpy and inconsistent during application.
FAQs
How long does homemade lip balm stay fresh before expiring?
Homemade lip balm made with beeswax, coconut oil, and shea butter stays good for three to six months when you store it in a cool, dry spot away from direct sunlight and heat.
Can I make lip balm without using beeswax at home?
Yes, you can substitute beeswax with candelilla wax or carnauba wax for a completely vegan alternative. The texture changes slightly, but the balm still solidifies and moisturizes your lips effectively.
Is homemade lip balm safe for people with sensitive lips?
It is safe when you use natural food-grade ingredients and skip synthetic additives entirely. Always do a quick patch test on your inner wrist 24 hours before applying the balm to your lips directly.
Can I add natural color to my DIY lip balm recipe?
You can mix in natural colorants like beetroot powder or cosmetic-grade mica powder during the melting stage. Add a small pinch and stir well for even color distribution throughout the entire batch.
Where do I buy beeswax and shea butter in India?
You can order cosmetic-grade beeswax and unrefined shea butter from Amazon India or Flipkart. Local organic stores in most Indian cities also carry these ingredients at prices starting from ₹100 to ₹200.
My Final Word
Making DIY lip balm with natural ingredients at home is one of the smartest things I have done for my lip care routine this year. Each batch costs me under ₹100 and takes less than 10 minutes from start to finish.
The results outperform every store-bought product I have tried over the past several years by a wide margin. My lips stay soft, hydrated, and healthy throughout the entire day with zero chemical exposure.
I genuinely encourage you to try this recipe at least once this weekend. Follow every step I shared above exactly, and you will notice the difference from your very first application.
Once you experience what real natural lip care feels like, going back to overpriced commercial products will never make sense again. Your lips deserve better, and now you know exactly how to give them that.
Disclaimer
This article is for informational purposes only and is based on personal experience. Results may vary depending on individual skin types and sensitivities. Always perform a patch test before using any new ingredient. If you have severe skin conditions or allergies, consult a qualified dermatologist before trying DIY remedies.

Dr. Jushya Bhatia Sarin is a qualified dermatologist with M.B.B.S., M.D. (Dermatology, Venereology & Leprosy), and MRCP (SCE), UK. She is the founder member of Sarin Skin Clinic in Defence Colony, New Delhi, specializing in skin, hair, and nail health. Her work focuses on providing personalized skincare solutions and making reliable skin care knowledge accessible to everyone.
